Swapping out the wire on your cheese slicer board
For information on how to clean and care for the wood on your new cheese board, please see the Upkeep & Care page.
Your new cheese slicer board comes with two extra slicing wires, just in case your first one needs a backup! Below are the easy instructions for replacing the slicing wires:
Unscrew the handle to detach it from the threaded wire tensioning anchor.
Pull the cutting arm straight out from the side of the board to remove it.
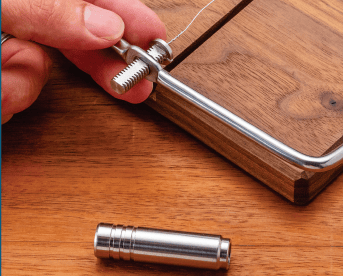
Grab the included hex key to loosen the set screw on the wire tensioning anchor and take out the broken wire.
Insert the looped end of the new cutting wire into the slot in the anchor. Make sure the loop is positioned for the set screw to go through the middle, then tighten it up. (See Figure 1. Click the image for a full view.)


Figure 1
Fit the arm of the hardware into the 1/4” diameter hole. As you slide it in, make sure to position the loop at the other end of the cutting wire into the slot and align it with the hole in the board—this will let the arm pass through the loop. There’s a handy groove at the end of the arm to keep the wire from slipping, so get that loop snug in there. (See Figure 2. Click the image for a full view.)


Figure 2


Pop the threaded wire tensioning anchor (with the wire attached) back into the arm. (See Figure 3. Click the image for a full view.)
Figure 3
Screw the handle back onto the wire tensioning anchor and start tightening it up. Be sure to check that the loop at the top of the arm is seated snugly in the groove. (See Figure 4. Click the image for a full view.)


Figure 4


Tighten the handle to get the cutting wire nice and taut. Your cheese slicer is now ready to go! (See Figure 5. Click the image for a full view.)
Figure 5
I sourced the hardware for these boards at Rockler Woodworking and Hardware.
Need addition replacement wires? Grab them right here.
Custom wood creations made just for your unique space!
Maker
Join my mailing list
Loveland, Miami Twp, Ohio
© 2024. All rights reserved. Copyright Crafted By KvG
Kevin von Gillern


